In a Haze
No, we’re not just blowin’ smoke…
Lately there has been an unusual amount of questions about fog machines and creating smoke on sets, so I decided to post some additional information in more detail.
Since the early days of romance and visual enhancement capabilities, man has always tried to figure out new ways to create a perfect mood for a successful reproductive moment. No, I’m not necessarily talking about reproductive act itself, as much as the mood setting that goes hand-in-hand with it. It seems lights are the first thing we like to turn down low, which works wonders when done right.
There is an effect we see all the time in movies and photographs. Without it, the set seems to be lacking a key element to really tell the story. It sets a subsidiary effect in an image or movie scene that we hardly notice when used correctly since it’s barely visible to the naked eye unless you know exactly what to look for… this effect is haze, smoke or fog.
If you look at old or new movies, you can often see that most of them have a slight, smoky element in the room that adds a certain mystique. It also enhances the depth and detail of back lighting by creating a great atmosphere.
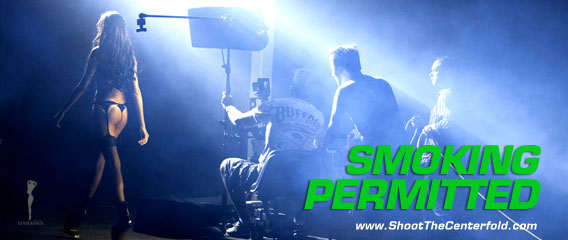
There are several different types of smoke effects that you can easily create that will give your photos a unique look. Some photographers usually get a smoke machine and squirt a puff of smoke onto their set, but personally, I think that this is just as wrong as throwing lights on a set and assuming that they’ll just fall magically into place.
Applying smoke to a set correctly must be a very calculated effort depending on the look you are trying to achieve. Here are a few different types of smoke effects which I have categorized.
Choose your flavor of smoke…
 1. Heavy particle smoke. You can clearly see the texture of the smoke cloud that has just come out of the smoke machine; a heavy cloud-like smoke effect that often creates an uneven look (sometimes by choice) and smoke just sits in one spot overpowering a specific area instead of filling the entire room. (See train pic). This often can be the result of a rushed shoot preparation or just simply a lack of knowledge on how to distribute different types of smoke effects for different supportive looks.
 2. Here is a picture from an editorial pictorial by Benoit Perevelli for Madame Figaro, where you see heavy smoke particles inside a train. It makes you wonder if the atmosphere should have been with more of a haze instead. These kind of decisions clearly become a question of taste and preference. Direction chosen during the shoot can be crucial and add or take away from production values of the shoot that is usually set by the photographer or the art director.

3. Subtle overall haze. This is what you see in movies and good photographic scenes. The smoke is evenly applied to the set and does not take away from the scene. When you apply smoke to your set, first let the smoke settle, then disturb the air by either walking threw it or fanning it manually to allow it to be distributed evenly. Wait about 10 minutes after doing so to let it settle once more and you will have a perfect haze on your set. Also, make sure that the smoke is not too visible unless you specifically want to create a heavy effect.
 Here is a video on how I distribute smoke evenly on my sets to larger areas. I have a garden blower from Home Depot I got for $59.95 that I use to blow the smoke around. The blower sucks the smoke in from the air intake and blows it out through the nozzle. This is a great, effective way to get haze in spaces of any size.
If you have too much smoke between your camera and the model, the key light may create an unwanted effect by illuminating the smoke in the foreground instead of the model. ALL of this depends on the size of your set or room as well. (Turn your air-conditioner off to keep the smoke from being blown away.)
 4. Low smoke. (Low Lying Fog Machine) You can use a dry ice smoke machine to create an interesting effect. Some smoke machines have a compartment for dry ice and you can run your smoke through it. This type of smoke will become cold and remain at floor level instead just spreading randomly all over your room space from top to bottom. You can see this kind of effect used in horror movies where the smoke lays at ground level as they walk through a spooky graveyard.
- Remember that the use of dry ice increases the level of carbon dioxide in the air where it is used. This can present a respiratory hazard low to the ground (or downstairs, if applicable), in enclosed spaces, or with large quantities of dry ice.
 5. High, elevated smoke. This is something you don’t see so often because photographers don’t know how to elevate smoke and I don’t blame them. Why would you need to create elevated, standing smoke in the first place? Well, by doing so you can give your client or editor something they weren’t expecting in a million years and it will blow their socks off.
It’s all a matter of physics. Just like cold smoke, which is heavier at room temperature and automatically fall downwards, heated smoke will rise upward just like helium, but in a more moderate way. What’s really cool about all this is that these temperature controlled smoke effects remain effective for a good 10 to 15 minutes before it dissipates.
The resulting smoke should not smell “burnt.” If it does, likely causes are too high of an operating temperature or too much glycerine/glycol/mineral oil in the mixture. The lower the percentage of organic, the less expensive the fog juice, but the fog will be lighter and will not last as long. Distilled water is only necessary if a heat exchanger or other tubing is used in the system. Using a homemade fog mixture in a commercial machine will almost certainly void the warranty, possibly damage the machine, and possibly pose a fire and/or health hazard.
- This type of fog is heated and will rise or disperse at a higher level than dry ice or liquid nitrogen fog. Coolers can be used if low-lying fog is desired.
- Changing the mixture or conditions of dispersion of atomized glycols can result in many special effects that are difficult to achieve with other simulated smokes.
- Glycols can undergo heat denaturation into highly toxic substances, such as formaldehyde. This is one of the major problems with homemade smoke machines – they may operate at a temperature that is incompatible with the substances being used. Also, this is a danger with homemade fog juice used in commercial machines.
- Glycols, glycerine, and mineral oil can all leave an oily residue, resulting in slick or sometimes slightly sticky surfaces. Be aware of the potential safety hazards, especially since the smoke may limit visibility. Also, some people may experience skin irritation from exposure to glycol fog.
- Some glycols are toxic and should not be used to create smoke. Ethylene glycol is poisonous. Some glycols are sold as mixtures. Medical or pharmaceutical grade non-toxic glycols only should be used in smoke machines. Do not use antifreeze to make a fog mixture. The ethylene glycol types are poisonous and the propylene glycol types always contain undesirable impurities.
- If water is used, it needs to be distilled water, since hard water deposits can damage the atomizer apparatus.
How to create a smoky atmosphere without having smoke machine.
 Not so long ago, I was a photographer in the “America’s Top Model” television franchise and as the shooting day approached, I completed my equipment wishlist to give to the producer of the show. On the day of the shoot, I realized that the smoke machine had not been delivered as requested. One of the scenes really required a hazy smoke effect to make it work and this was not going to happen without a smoke machine. So, I had to execute “Plan B,” play it cool and make it happen anyway. As Gary Cole would put it, “The clients cannot print your excuses instead of your images.”
This is when a photographer’s readiness, quick thinking and photo knowledge is put to the test. I had 15 minutes before the show started filming, so I used a technique known more in fashion than glamour which works wonders when done right. It creates a similar effect as you would if a smoke machine were present.
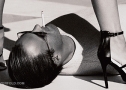
What I did was “bleed” a strobehead just enough into my camera lens to create a light, beautiful bleed (as seen in the sample image) and save the shoot. They even published one of the images to promote the show. It’s really a lens flare to substitute smoke, but it does have the effect of creating a haze on your lens element, which will give a similar effect. When you use this technique, you need to remember not to aim your strobehead directly at your lens. There is a specific angle that will give you the best results that will create the effect I’ve just described.
Smoking is bad for your health, but great for your images. Inhale beauty, not the smoke.
www.ShootTheCenterfold.com