Selective lighting
By: Jarmo Pohjaniemi
There are multiple factors when creating great images and the most important of them all is lighting. Light is something that can be applied, shaped, modified or reduced from your subject. Both light and shadow play a part in our visual interpretations – we need light to see, and seeing is what photography is all about.
Each person has their own unique vision and a single object can be seen in many diverse ways, depending on the photographer’s experience, tastes and requirements. We’ve seen it time and time again at our seminars; model, location and lighting, but it is the eye and mind behind the camera that makes the difference.
Conversely, you can take the same model and location and all you have to do to change the mood, atmosphere or meaning of the image is to vary the lighting. Light is the closest thing we have to being able to create magic. It gives us the ability shape and create impressive visual illusions, modifications and enhancements, regardless of the subject matter. While our images must remain realistic, when can decide which reality we choose to share.

So, why is it that most photographers do not use light to their benefit and instead settle for a less flattering lighting formula? While there are many reasons, the most common of them is that many photographers choose to work with the common lighting they see on a daily basis. Either that, or perhaps they don’t quite know how to light the subject properly.
 Despite a vast array of lighting equipment available at a photographer’s command, the truth is that not everything requires additional lighting, and natural light is usually more than enough to light the subject. Simple light is one of the most beautiful of natural phenomena, or “God’s creation” as some would put it. The issue at hand is that we sometimes cannot control natural light as easily as we can artificial light. Yes, we have reflectors and shadowing at certain times of day that can create mystical, ethereal scenarios, and the largest majority of photographers around the world use natural light (and I don’t blame them because I’m one of them).
We use strobes to approximate natural light and try to make our subject as beautiful and realistically lit as possible. We do this because we can’t always rely on natural light and don’t have the luxury of waiting for the right conditions to present themselves. It can be a cloudy day, or even worse, rainy and gloomy. This is where a working knowledge of strobe and constant light is everything. Clients will always hire a photographer who’s ready for any situation and can handle artificial lighting in addition to natural lighting.
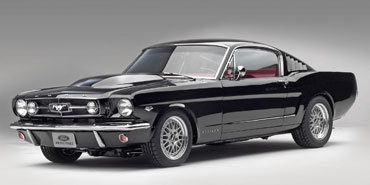
Strobe lighting will provide sharper results compared to those of natural light photography. It also gives you the ability and variety as far as lighting goes. It’s possible to emphasize different areas of your subject and isolate specific area for better image quality. It’s important to guide your viewers to the elements of a photo you want them to see while subduing other areas. You see this all the time in advertising, especially in car commercials where specific parts of the car are lit differently from the rest  of the vehicle. Your eyes automatically go to the brightest portion of an image. From there, the message(s) of the image can be delivered to your brain for processing, either consciously or subconsciously. This is a very common lighting technique and is used well not only in glamour and fashion, but also – not surprisingly – in advertisements.
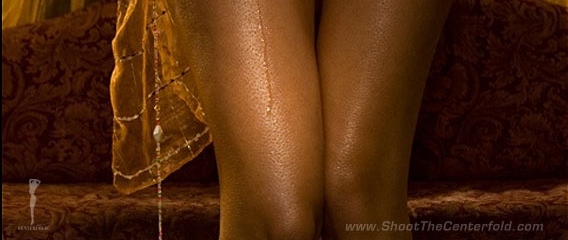
Various elements and textures react differently depending on the type and direction of light, which opens endless possibilities for exploring varying effects. In this photo, you can see the model’s legs have been lit to accentuate specific areas. The goal was to make them look sensual in a moody lighting situation.
 The key elements in this image are:
- Six strobe lights
- Water mist
- Lingerie (as a reference to create seductive illusion)
- Couch and curtain to add a realistic look.
The wooden planks were added to the bare studio floor, which did not support the feel I was planning to achieve.
As you can see, one of the lights is directly aimed at the model’s leg, acting almost as a spotlight to offset the keylight, which is covering the overall image. This creates a nice, uneven, almost pattern-like lighting effect. Without this effect, the results would be an even light and your eyes would not automatically go to the intended area. There is also a rimlight on her leg (at camera left) with very subtle power to illuminate it and separate the leg from the couch, unlike the other leg. This technique is used to add different depth elements to the image. Controlling the light fall-off, direction, f/stop and color temperature gives you the ability to accomplish beautiful results.
A similar technique can be found in product photography. Why is it that photographers often settle for lesser techniques? While I hesitate to use the term “lazy” I do feel that because this is what most photographers are used to seeing, it’s the most duplicated. Too often, photographers tend to shy away from a challenge that has the possibility of making their images stand out. To prove a point, imagine this same image with flat lighting and you’ll see what I mean. It’s acceptable, but anybody can do that. It’s not what you’d want if you want to move ahead with your career.
Street and location photography has recently made a nice entry in the photography market and some clients have welcomed this photographic style into their product line. This style is not based on lighting as much as it is on a photojournalistic concept (and a less flattering way of portraying their product, in my opinion). One thing will never change; good lighting will always remain the key to good photography, those who choose to adopt it have an advantage and a better possibility of succeeding.
To find out more about lighting techniques, visit our lighting diagrams and find your light, style and create your own.
These five lighting styles illustrate and share similar lighting technique and how to accentuate specific areas, as discussed in this blog post. Click the icons to learn more.


