
5 Additional Mistakes Photographers Make with Photoshop

After our last post with the link to the video describing some common mistakes photographers make when using Photoshop, you felt the list was far from complete.
We get many contributions to the website and fan group and we review even more submissions from hopeful photographers every day. Below you’ll find five more mistakes that are made very often from amateur and aspiring photographers.
1. Over-whitening the eyes. I’m going to blame this one on a quite well-known instructor who runs a major tutorial business. His argument for adding brightness to the eyes is that the viewer’s attention will be focused on the brightest area of the photo. Take some advice from Andy Defrancesco and understand what you can do to grow your business.
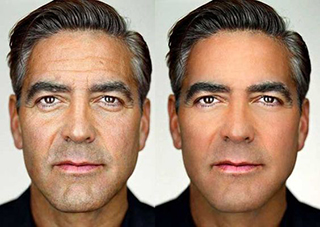 Since our vision gravitates to a subject’s eyes when looking at a photo, drawing, or painting, it only stands to reason that you’d want to enhance that by making the subject’s eyes the brightest thing in the image, right? Wrong.
Our brains actually know how bright the whites of the eyes should be based on the available light in the environment and when photographers over brighten the eyes in their images, it looks artificial and unnatural.
2. Excessive skin blurring. The overuse of frequency separation was mentioned in the previous post’s video. This is where you create two layers of the image: one with all the detail in black & white and one with just the color. From there, you are able to even out the skin tones by sampling one color of the skin and painting on a blank layer over a different layer without destroying the detail of the skin.
“When done correctly, a retoucher can cover blotches, sunburns, or just plain unevenness in the skin tones”When done correctly, a retoucher can cover blotches, sunburns, or just plain unevenness in the skin tones. When done incorrectly, even though the skin details are preserved, the skin looks unnaturally even.
Quite often, people who use this technique incorrectly end up adding highlights and shadows where they wouldn’t naturally be present.
The image ends up looking bizarre and unrealistic. Frequency separation is a labor intensive process even when done incorrectly. What many amateurs do instead apply a blur (surface blur or Gaussian blur) to the skin and they wipe out the details? Yes, the skin will appear smoother,
 but the tradeoff is an unrealistic look that isn’t commercially viable (i.e., no professional client would accept it).
There are plug-ins available that do a similar job as frequency separation and skin blurs, and these tend to get overused and abused. The trained eye can spot the use of these plug-ins a mile away and use them when submitting your work to potential editors and clients will put you in a category of photographers you want to avoid.
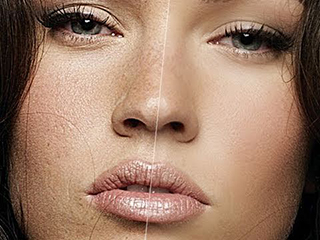
3. Uneven and unnatural skin tones. “As most photographers will soon find out in their artistic journey is that skin tones are rarely even”As most photographers will soon find out in their artistic journey is that skin tones are rarely even. Once under the microscope of Photoshop at 100 or 200%, they begin noticing the blotches, patchiness, and a variety of colors in the same model’s skin.
Obviously, when one part of a person’s skin is receiving more or less light than another part, it will be lighter or darker depending on how much light is present. 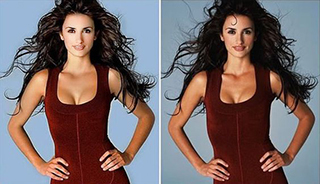 However, if two body parts are getting the same amount of light, the skin tone should be the same.
We’ve seen retouches where a model’s face was 2-3 stops brighter than the rest of the body yet the lighting was initially the same intensity when the shot was taken. This ends up looking fake and unnatural.
In addition, over saturating the skin (cranking that slider all the way to the right) only hypes the mistakes and ultimately creates an unpleasing and unnatural looking image—two things that editors and clients do not want! There are solutions for these two mistakes but they do take the time to do correctly. If done wrong, it’s very evident.
4. Selective color. Just because you can do  something doesn’t mean that you should. The selective color falls into this category. Selective color is where a photographer changes a color photo to B&W but leaves a particular selection of the image in color. Quite often we see selective color in images where the models’ lips are left red or a rose (or rose pedals) are colored red while the remainder of the image is in B&W.
The selective color was quite popular in the 80s and has since been made much easier with Photoshop. And now its overuse is to the point where it’s cliché. The theory behind utilizing selective color is similar to that of over whitening eyes: it’s about drawing the eye to a particular place in the image.
The viewer’s eye will be drawn to anything different and added color certainly stands out in a B&W image. However, it’s not a fresh or new technique and certainly isn’t in fashion today.
Editors and commercial clients are looking for the next big thing, not a rehash of the past. Using selective color looks gimmicky and dates the work of the photographer.
“When it comes to light, our brains are very smart. If the lighting on the composited background doesn’t match the composited subject, our brains notice it right away”5. Unrealistic composites. There are entire books and educational tutorials dedicated to this subject. Composites, scenes created in Photoshop using multiple images, can be awe-inspiring and used to make images come alive which would normally be impossible to create in real life.
However, they are very easy to do incorrectly and therefore often look very unrealistic. When it comes to light, our brains are very smart. If the lighting on the composited background doesn’t match the composited subject, our brains notice it right away, and the result is an unbelievable image (in a bad way).
 Also, many amateur compositors are unskilled at making selections in Photoshop (i.e. cutting around the subject, especially hair) which makes the composite even more unrealistic. The viewer can easily see remnants of the old photo either in color shifts in the hair, chopped portions of the hair/body, or jagged edges around the body/hair.
If composites are your passion, it’s best to do some thorough research to find proven techniques and practice, practice, practice.
If you are aspiring to be a professional photographer and any of these five mistakes hit home, you may want to reconsider some of your techniques and workflows. Most of these mistakes are easily corrected, and you don’t want them standing in the way between you and your future success.


© 2016 Copyright ShootTheCenterfold.com. All rights reserved.